Note: The following translations are for reference only. The final user is subject to the original English manual! !
Introduction
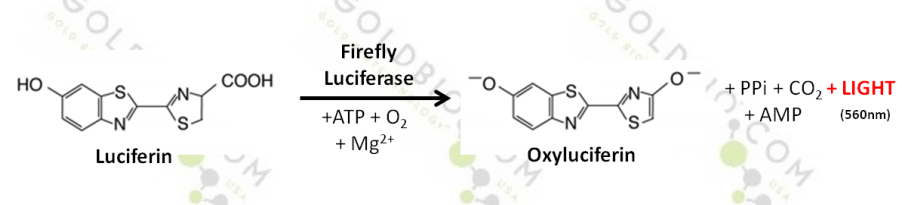
Fluorescein is a commonly used in vivo imaging bioluminescence reporter for luciferase expression. Using ATP and Mg 2+ as cofactors, the firefly luciferase reacts with the water-soluble substrate under aerobic conditions to emit a characteristic yellow-green emission, which is converted into red light at 37 °C in vivo. This reaction indicates the presence of energy or the presence of life by consuming ATP.
D-luciferin is a commonly used reagent in the field of biotechnology, especially in vivo imaging. Luciferase is inoculated in research animals such as rats, mice, to label tumor cells, stem cells or infectious diseases. Injection of D-luciferin in this model system by bioluminescence imaging can be used to monitor disease progression or drug efficiency in real time, non-invasively.
Product specific information
D- fluorescein potassium salt
4,5-Dihydro-2-(6-hydroxy-2-benzothiazolyl)-4-thiazolecarboxylic acid potassium salt
KC 11 H 7 N 2 O 3 S 2
Molecular weight: 318.42 g/mol
D- luciferin sodium salt
4,5-Dihydro-2-(6-hydroxy-2-benzothiazolyl)-4-thiazolecarboxylic acid sodium salt
NaC 11 H 7 N 2 O 3 S 2 .H 2 O
Molecular weight: 320.32 g/mol
Storage: -20 ° C protected from light.
material
l D-fluorescein salt
u Fluorescein Potassium Salt ( Qi Wei Yi Cheng , G156410 )
u fluorescein sodium salt ( Qi Wei Yi Cheng , G156411 )
l DPBS (Dulbecco's phosphate-buffered saline) without Ca 2+ or Mg 2+
l Syringe filter, 0.2um
Fluorescein preparation
1. D-fluorescein (potassium or sodium salt) is dissolved in DPBS (without calcium or magnesium) at room temperature to a final concentration of 15 mg/ml.
2. Pre-wet the 0.22 um filter with 5-10 ml of sterilized water and discard the sterilized water.
3. Sterilize the fluorescein solution through a prepared 0.22 um syringe filter.
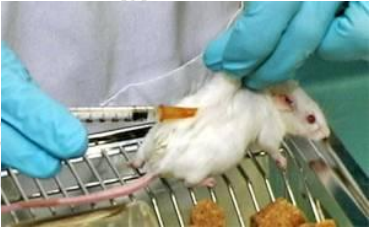
4. Inoculate laboratory animals according to different methods (usually fluorescein is inoculated into animals by intraperitoneal or intravenous injection).
For example: injection in a ratio of 10 ul fluorescein stock solution / g body weight (normally 200 ul per 20 g mouse injection, standard 150 mg / kg injection).
5. Wait 10-20 minutes before imaging to achieve maximum luciferase signal stabilization.
6. Complete a luciferase kinetic study of each animal model to determine its signal peak time and plateau.
Determine the kinetic curve
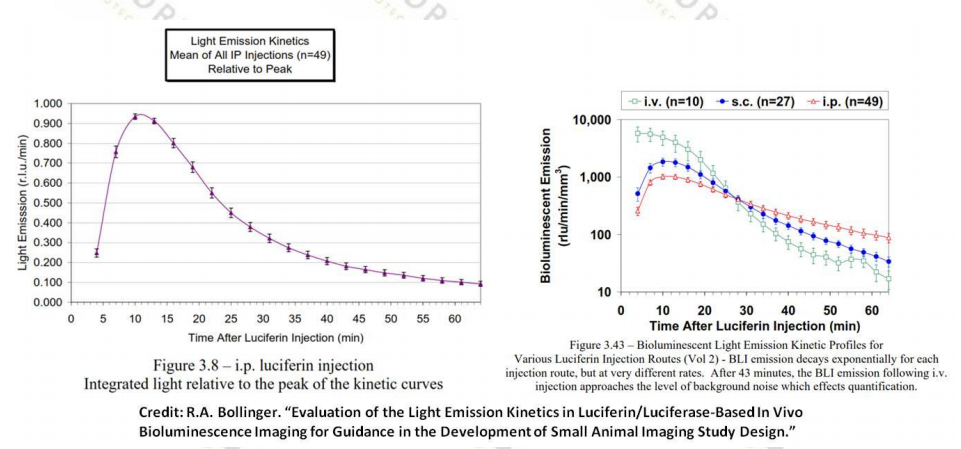
The kinetics of the tissue biodistribution of each animal model and experimental design is different. To determine the peak signal time after the injection of fluorescein in the animal model, it is recommended to establish the kinetic curve of each system before the experiment.
Establish a kinetic curve for the luciferase activity of your animal model:
1. Inject fluorescein by each of the recommended methods listed below (intraperitoneal, intravenous or subcutaneous). If the animal needs to be sedated prior to injection, note that this may cause the kinetic curve (luciferase peak time) to extend slightly. The biodistribution of fluorescein varies according to the route of administration.
2. For abdominal (IP ) or subcutaneous (SQ ) injections:
a. If you are still awake when you are injecting fluorescein, wait three minutes and then seduce according to your method (gas or injection anesthesia). See the appendix for the use of anesthetic/analgesic drugs and doses in rats and mice.
b. Place the animal that has used the sedative into the imaging chamber and see fluorescence imaging approximately five minutes after the injection of fluorescein.
3. For intravenous (IV ):
a. Immediately seduce the animal (if not sedated) according to your method (gas or injection anesthesia) to calm it. See the appendix for the use of anesthetic/analgesic drugs and doses in rats and mice.
b. Animals that have used sedatives are placed in the imaging chamber and fluorescence imaging is visible within two minutes of fluorescein injection.
4. To establish a kinetic curve for luciferase expression, imaging time can be taken every 5-10 minutes for intraperitoneal (IP) or subcutaneous (SQ) injection methods (for intravenous (IV) methods: Shoot once every 1-5 minutes for up to 20-30 minutes). (Most injections of anesthetics last 20-30 minutes, additional doses will be required for complete kinetic curve studies!)
5. Select the best imaging time point from the kinetic curve for your animal model. Most animal models peaked at about 10-20 minutes after intraperitoneal or subcutaneous injection of fluorescein into the animal, peaking 2-5 minutes after intravenous injection of fluorescein.
6. Intraperitoneal injection (IP )
Mouse
1. First determine the entry point of the needle.
2. Draw an imaginary line across the abdomen at the top of the knee joint.
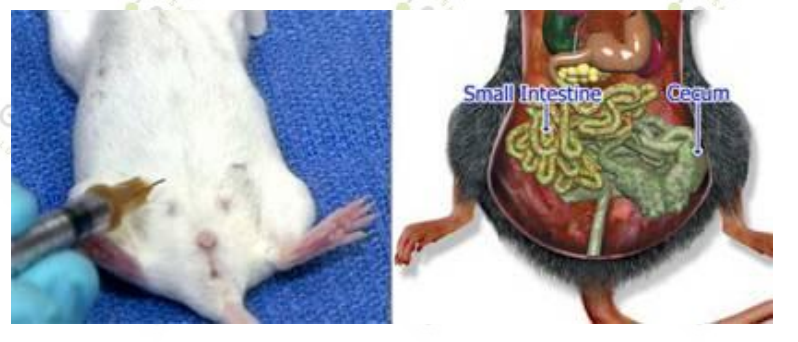
3. The needle should be inserted along the line on the right side of the animal and close to the middle. (For females, the entry point of the needle is located slightly in the middle of the last nipple.)
4. Insert the needle from the right side of the mouse to avoid the cecum. The cecum is a large fluid-filled organ on the left side of the abdomen. The small intestine (on the right side) is unlikely to be pierced by a needle.
5. The insertion of the needle from the insertion point is too far from the tail or lateral direction. The above display will be dangerous and may be injected into the hind leg, which will cause muscle tissue injury.
6. In order to complete the intraperitoneal injection, the mice must be well controlled to prevent movement during the procedure. Once the needle is inserted into the abdomen, the organ is damaged.
7. Control the mouse and tilt it so that its head is down and the abdomen is exposed.
8. Thoroughly disinfect the injection site with 70% ethanol.
9. For abdominal injections we recommend using a 25-27 gauge diameter needle to insert the abdomen at a 30 degree angle.
10. The needle should be inserted at a depth of approximately half a centimeter (4-5 mm).
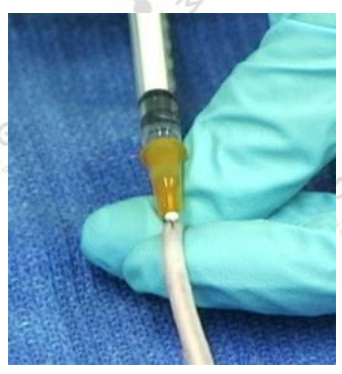
11. Gently aspirate to confirm that the needle does not penetrate the blood vessels, intestines or bladder.
a. Brownish green aspirate indicates that the needle has been inserted into the small intestine.
b. Yellow aspirate suggests that the needle is inserted into the bladder.
12. If any liquid is aspirated, it means your solution is contaminated and must be discarded and re-operated with a new syringe and needle.
13. If no liquid is being aspirated, you can start the injection.
14. Remove the needle and record the time of the injection to determine the peak time of the signal.
Rat
Follow the mouse intraperitoneal injection procedure. For rats we recommend a 25 gauge diameter needle injection.
note
l Make sure the needle is tilted.
l Tilt the animal's head downwards in order to move the intestines downwards to keep the lower part of the abdomen as a cavity.
l For precise injection depth to prevent deep injections, we recommend placing a catheter with a suitable depth of 4-5 mm on the needle.
l To ensure the injection volume, we recommend no more than 2ml for mice and no more than 5ml for rats (please refer to the appendix for different injection volumes for different animals and sites.)
l When the rats were injected, the cover of the rat was used to prevent the mice and the researchers from being nervous.
Intravenous injection
Mouse
Tail vein injection
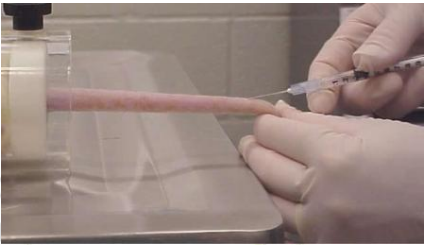
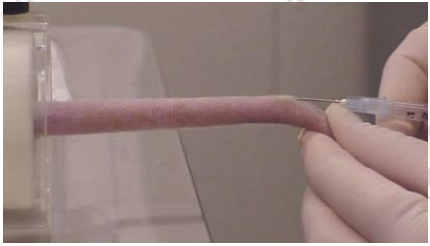
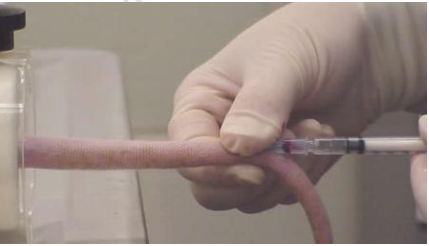
Control mice by chemical or physical means (see appendix for the use of anesthetics/analgesics and doses in rats and mice.) Gently rotate the tail of the mouse to visualize the blood vessels, disinfect with 70% ethanol, and use a slight tilt angle (27-30 gauge) A needle of a diameter is inserted into the blood vessel. Can not suck out, but slowly inject and observe the transparent lumen. An incorrect site will form a small bump at the end. If this happens, remove the needle and re-operate near the original position. When finished, remove the needle and press the injection point. The injection time was recorded to determine the peak time of the signal.
Tail vein injection--- introduction
 It is beneficial to induce peripheral vasodilation before the tail vascular injection, which makes the blood vessels more visible. The body temperature of the mouse can be increased with an incandescent lamp or the tail of the mouse can be immersed in warm water or treated with a vasodilator such as xylazine or acepromazine. You can also use the light source to illuminate the tail, which will make the blood vessels easy to see and enter.
The safe water temperature is 110 °F or 43 °C, which makes the mice feel slightly warmer. Although it is beneficial to heat anesthetized mice, care should be taken to cause burns or excessive heating.
The tail vessels are located on either side of the tail of the rat and appear to be under the skin on the surface. If the needle is inserted correctly, you may see or not see the blood flashing at the needle interface. You can also feel that the resistance is small when the needle passes through the subcutaneous tissue into the lumen of the blood vessel. At the same time, by injection, the fluid will It flows easily into the blood vessels, and the blood vessels become transparent (brightened by darkness) because the liquid temporarily replaces the blood (as seen in the picture above).
Rat
Tail or saphenous vein injection
The tail injection operation is the same as the mouse.
1.

Place the animals in a control unit and heat the tail with a water bath, taking care not to overheat the animals.
2.
Tightly straighten the tail and rotate it so that the venous blood vessels are facing up. Insert the needle 1 cm away from the finger.
3.
After penetrating the skin surface, re-adjust the syringe parallel to the tail and then inject slowly.
4.
Use the large female finger to hold the injection point to prevent bleeding before removing the needle.
For saphenous vein injection
1. Control the rats with sedatives (see Appendix for use of rat and mouse anesthetics/analgesics and doses).
2. Stretch the hind legs and scrape off the hair to expose the saphenous vein.
3. Disinfect the injection point and press the pressure on the upper part of the leg like a hemostasis.
4. Insert the needle into the vein and aspirate.
5. Release the pressed area and inject.
6. Remove the needle after completion and take appropriate hemostasis.
7. Record the injection time to determine the peak time of the signal.
For intravenous injection in rats we recommend a 22-25 gauge diameter needle.
note
l There is no air bubble or foam in the injection, which will kill the small animal.
l Control animals in a firm and gentle manner.
l Do not inhale
l Injection is slow
l Warm the bath to the tail so that the blood vessels are visible.
l The solution will easily flow into the blood vessel. If there is no inflow, re-change the needle and repeat the operation once.
l After the injection, use a large finger to briefly press the injection point to stop the bleeding.
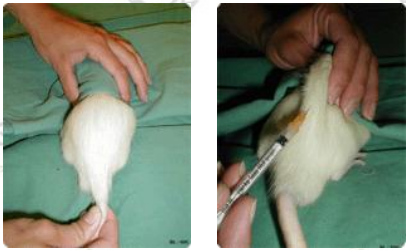
Subcutaneous injection
Mouse
Subcutaneous injections are generally used for injection of sedatives or for hydration of solutions during anesthesia recovery. The subcutaneous route of administration is generally abbreviated as SC or SQ. The amount of solution injected should be limited so that the skin does not stretch excessively (which would be uncomfortable) and it cannot be unnecessarily over-hydrated. The general subcutaneous injection volume is 1 ml or less.
l The most common injection site is loose skin in the neck and shoulder areas.
The mice were controlled in the usual way and the skin was lifted with a finger like a tent. The injection site was sterilized with 70% ethanol. A 22 gauge diameter needle is recommended for subcutaneous injection.
step
1. Lift the skin on the back to form a “tentâ€. (If the mouse is awake, place the mouse on the linear cover so that it can be grasped with its front paw during the injection.)
2. The back skin is held up, the mice are held by hand and injected in the exposed area.
3. Insert the needle into the root of the skin and carefully pist the needle around the finger. Your finger should be on top of the skin and the upper part of the needle insertion point is safe. Hold the needle in parallel and insert it into the animal to avoid penetrating the underlying tissue.
4. Aspiration ensures that the needle does not enter the blood vessel. There should be no aspiration if the position is correct.
5. Inject the liquid at the appropriate rate.
6. Remove the needle and press the skin to seal the pinhole on the skin to prevent fluid from flowing out.
7. Check the animal for any bleeding. Because the liquid has accumulated in the subcutaneous space, you can see and feel the bubbles of the liquid, called the blisters.
8. Record the injection time to determine the peak time of the signal.
In general, when mice hold the linear cover tightly, they do not object to subcutaneous injection.
Rat
Follow the mouse subcutaneous injection method, but hold the rat on the table instead of the linear cage. It is recommended to use a 23-25 ​​gauge diameter needle and inject no more than 5 ml of liquid.
The most common injection site is the loose skin around the neck and shoulders.
note
l Make sure that the angle of inclination of the needle during injection is important.
l When the rats were injected, the cover of the rat was used to prevent the mice and the researchers from being nervous.
l Gently press the injection point to help dissipate the bubbles.
appendix
Table 1 : Recommended injection sites, injection volume and needle size for mice
way | Site | Maximum volume | Maximum needle diameter |
SQ | Scruff | 1ml | 22 gauge |
IM | Caudal thigh | 0.05ml | 25 gauge |
IP | Lower ventral quadrants | 2ml | 25 gauge |
ID | Lateral abdomen/thorax | 0.05ml | 27 gauge |
IV | Lateral tail vein | 0.5ml | 27 gauge |
Table 2 : Injection site, needle diameter and injection volume for different routes of administration and animal models (Source: Harkness and Wagner's "Biology and Medicine of Rabbits & Rodents.")
Route of administration | Gerbil | Hamster | Mouse | Rat |
IM | Site
volume Needle diameter | Quadriceps ≤0.03ml <23 gauge | Quadriceps, Gluteals ≤0.15ml <23 gauge | Quadriceps ≤0.03ml <23 gauge | Quadriceps, Gluteals,triceps ≤0.25ml <22 gauge |
IP | Site
volume
Needle diameter | Lower right quadrant of abdomen ≤2ml <25 gauge | Lower right quadrant of abdomen ≤3ml <21 gauge | Lower right quadrant of abdomen ≤2ml <25 gauge | Lower right quadrant of abdomen ≤5ml <22 gauge |
IV | Site volume Needle diameter | Lateral tail vein ≤0.5ml <23 gauge | Not Recommended | Lateral tail Vein ≤0.5ml <27 gauge | Lateral tail vein or saphenous veins ≤2ml slowly <22 gauge |
Intra- Gastirc | Site
volume
Needle diameter | Stomach N/A 18-22 gauge 2-3cm long bulbed feeding needle | Stomach N/A 18-22 gauge 4-4.5cm long bulbed feeding needle | Stomach 5-10ml/kg 18-22 gauge 2-3cm long bulbed feeding needle | Stomach 5-10ml/kg 15-18 gauge 6-8 cm long bulbed feeding needle or 8 french flexible catheter |
SQ | Site volume Needle diameter | Neck, back ≤1ml <22 gauge | Neck, back ≤3ml <21 gauge | Neck, back ≤1ml <22 gauge | Neck, back, abdomen ≤5ml <21 gauge |
Table 3 : Rats and mice use different sedative drugs
(IP=intraperitoneal; SC=subcutaneous; PO=per os(by mouth); IV=intravenous)
drug | Rat dose ( mg/kg ) | Mouse dose ( mg/kg ) | annotation |
Tranquilizers/sedatives | | | |
Acepromazine | 2.5 IP | 2.0-5.0 IP; SC | Light sedation |
Diazepam | 2.5-5.0 IP | 5 IP | Light sedation |
Midazolam | 5.0 IP | 5.0 IP | Light sedation |
Xylazine | 1.0-5.0 IP | 5.0-10.0 IP | Light to heavy sedation; some analgesia |
Anticholinergics | | | |
Atropine | 0.05 IP; SC | 0.04 SC | Reduces secretions; protects heart from vagal inhibition |
Glycopyrrolate | 0.5 IM | | Reduces secretions; protects heart from vagal inhibition |
Analgesics | | | |
Buprenorphine | 0.01-0.05 SC q8-12h | 0.01-0.05 SC q8-12h | For moderate to severe pain |
Butorphanol | 1.0-2.0 SC q2-4h | 1.0-2.0 SC q4h | For moderate to severe pain |
Ketoprophen | 5.0 SC or PO | ? | For moderate pain |
Meloxicam | 1.0 SC or PO | ? | For moderate pain |
Injectable anesthetics | | | |
Ketamine+xylazine | 75-100+10 IP | 80-100+10 IP | 20-30 minites surgical anesthesia |
Ketamine+medetonidine | 75+0.5 IP | 75+1.0 IP | 20-30 minites surgical anesthesia |
Ketamine+acepromazine | 75+2.5 IP | 100+5 IP | 20-30 minites surgical anesthesia |
Ketamine+diazepam | 75+5 IP | 100+5 IP | 20-30 minites surgical anesthesia |
Ketamine+midazolam | 75+5 IP | 100+5 IP | 20-30 minites surgical anesthesia |
Pentobarbital sodium | 45-50 IP | 50-90 IP | Anesthesia |
Propofol | 10 IV | | 5 minites surgical anesthesia |
literature
All injection methods are from the AALAS Learning Library
image
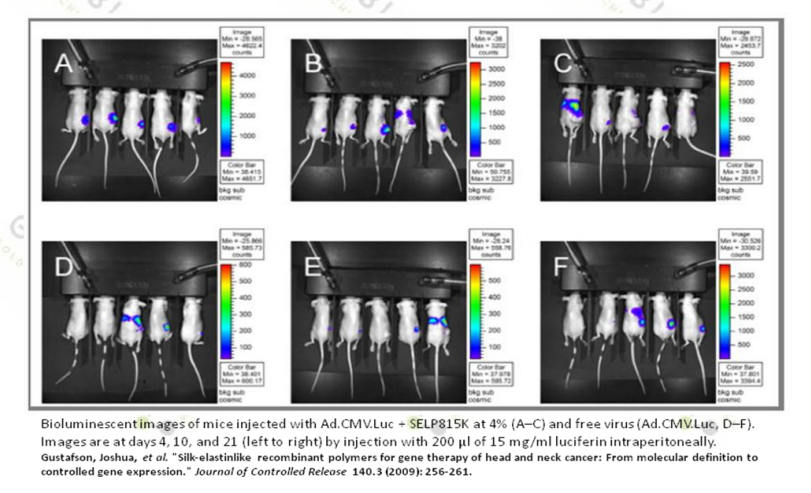
1. Gustafson J, et al. (2009). Journal of Controlled Release, 140(3), 256-261.
2. RA Bollinger. Dissertation: Evaluation of the Light Emission Kinetics in Luciferin/Luciferase-Based In Vivo Bioluminescence Imaging for Guidance in the Development of Small Animal Imaging Study Design.
3. Boston University, Animal Care Research Compliance.
4. Boston University, Animal Care Research Compliance.
5. LSSU-School of Biological Science-Institutional Animal Care and Use Committee.
6. Boston University, Animal Care Research Compliance.
7. LSSU-School of Biological Science-Institutional Animal Care and Use Committee.
form
1. US National Institute of Health
2. Adapted from Harkness and Wagner's “Biology and Medicine of Rabbits & Rodents.â€
3. Saskatchewan Association of Veterinary Technologists (SAVT).
Plant Extract powder
1. Maca Extract can be applied in pharmaceutical field.
(1) Maca Extract can promote libido and sexual function.
(2) Maca Extract can support the glandular system.
2. Maca Extract can be applied in health care products.
(1) Maca Extract can promote mental clarity and concentration,Increases libido and improves sperm quality
(2) Maca Extract owns the effect on supporting stamina and buffers the effects of stress.
(3) Maca Extract can boost work capacity.
Our company offers variety of products which can meet your multifarious demands.including API Powder.Pharmaceutical Intermediates.Vitamins Powder.Plant Extracts.Food Additive.Peptide Powder and so on We adhere to the management principles of "quality first, customer first and credit-based" since the establishment of the company and always do our best to satisfy potential needs of our customers. Our company is sincerely willing to cooperate with enterprises from all over the world in order to realize a win-win situation since the trend of economic globalization has developed with anirresistible force.
Application
1.Applied in food field, maca extract is used as an anti-aging food,butt enhancement;
2.Applied in health food field, maca extract is also used as an afrodyn;
3.Applied in pharmaceutical field, maca extract is used to treat organ dysplasia,premature ejaculation and male impotence
|
Name
|
Maca Extract
|
|
Active Ingredient
|
Maca Extract
|
|
Appearance
|
powder
|
|
Grade
|
Food Grade
|
|
Storage
|
Cool Dry Place
|
product Photo:

Plant Extract Powder,Maca Root Extract,Resveratrol Powder,Calcitriol Powder
Shaanxi YXchuang Biotechnology Co., Ltd , https://www.peptidenootropic.com